
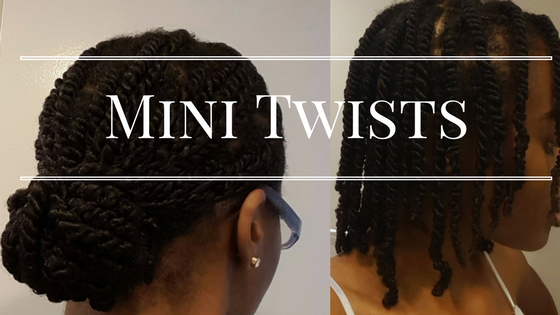
Many of you have asked me about my mini twists installation process. Unfortunately, I did not record the process, but I took pictures. Hope it helps.
I did these particular set of twists on soaking wet hair…intentionally. I wanted it to shrink up, so I didn’t have any hair hanging on my shoulders or in my back. If you desire the opposite results (stretched twists), you could slightly blow out your hair and simply avoid getting them wet.
PRODUCTS & TOOLS Used:
Rattail comb (for parting), spray bottle with water, Jamaican Black Castor Oil (a.k.a JBCO), Shea Moisture’s 10-in-1 Renewal System Hair Masque, Hair Clips, Hand Mirror.
FIRST, I did the LOC method (water, JBCO, Hair Masque) all over my hair and then I did my basic parts. [FYI: Adding your products all over your hair, saves you so much time. If you try to add products to each little section, this style will take forever to complete.]

Start from the bottom and work your way up toward your face.
You will have to decide how small you want your twists to be. Keep in mind the amount of time it will take. You don’t want to do this style in a rush. You want your twists to all be around the same size.
Make a straight part from left to right, dividing the bottom section in half. Due to the size twists I wanted, my first row (at the nape of my neck) had 3 twists. I wanted to attempt brick layers, instead of freestyle parts (which I usually do). Here’s where your clips and hand mirror come in handy.
To save even more time, I did all the parts for each row I created, and simply used my clips to keep the hair separated.


Repeat the same steps in the middle section and in the front. Only difference is, with the front, I first did a center part and worked my way up from my ear to the center part.


I wore my twists down for a week. They were super soft, shrunken, and springy just as I wanted. Every night, I lightly sprayed them with water and used to satin scarf to tie them down.
Unfortunately, with kinky curly hair, it doesn’t take long before the twists get frizzy, so I decided to co-wash my twists and do them over, but only this time I added Eco Styler Gel to each twist (trying to keep them neat for at least a week).


To be honest, I preferred how my twists were BEFORE adding the gel, which is why I kept it styled for the majority of the week.

Here’s how I cowashed my twists:
***Subscribe to be notified when new blogs are posted.